
All Boxed Up - Object properties
3. Setting up the object properties
Now we have a ground for our playarea. Let's give it some properties. Click on one of the Ground tiles and head to the property window (usually on the left).
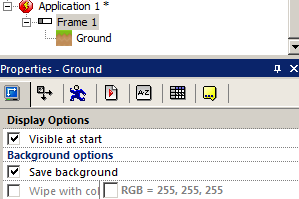
Click on the 3rd tab across (Movement) and select Physics – Background from the movement dropdown list. Then select 'Obstacle' from the Obstacle list.
Now we have a ground for our objects to fall onto. Let's place some more objects. Next grab the 'Sky' object and position that in the screen, that will be our background.
Now, we need crates! In the All Boxed Up library window, drag and drop a crate object into the playarea.
![]()
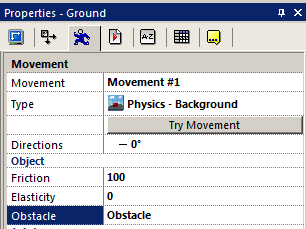
In the properties tab of the Crate, select the 3rd tab across (movement) and select Physics – Static Movement.
You can keep everything pretty much default as seen in this image to the left, go down to the bottom of this property window and select Collision Shape > Box. As that is what the object is, a Box shape. This plays an important role in future games as it allows for better collision detection.
Check the boxes Auto Rotation and Smooth Rotations. This will tell Clickteam Fusion 2.5 to automatically rotate the box image when the box rotates and the Smooth Rotations tells Clickteam Fusion 2.5 to 'smoothen' the image when automatically rotating the object (so the object doesn't have sharp edges.
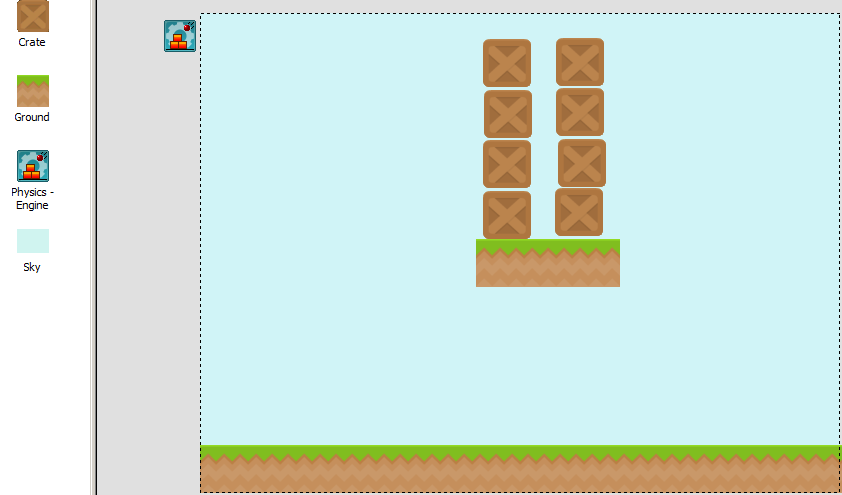
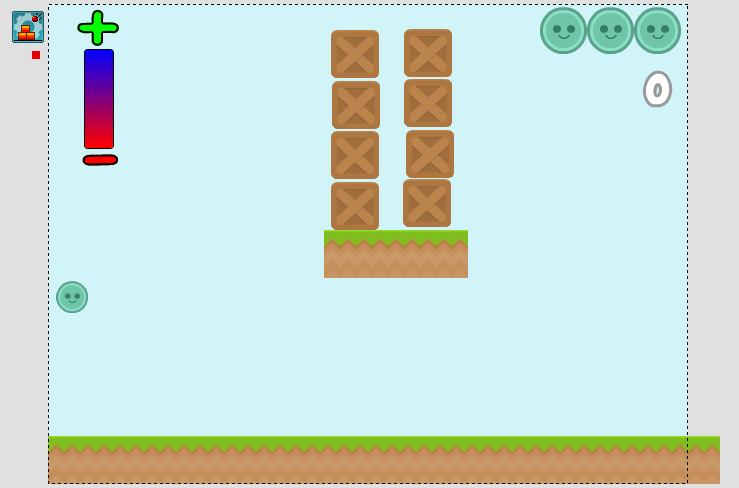
Now we have a ground for our objects to fall onto. Let's place some more objects. You will see to the left of the frame, a list of objects already in the frame. Let's create a sort of 'ledge' with the ground and position some boxes on top of it, like below. Position of the ledges are around 250 in the Frame Y. You can check this by clicking the object, selecting the 2nd tab in the property window and seeing its Y position.
You can see our level slowly coming together. Now we need to add our 'character' that we are going to throw into the boxes to make them fall over. In the graphic library, drag in 'Ken' our little circle friend.
![]()
We are now going to give Ken some properties which will make him our main player in the game. Once Ken is in your playarea, click on Ken and hover over to the Properties Window.
In Ken's properties, we need to first give him a movement. Click on the 3rd tab across (movement)
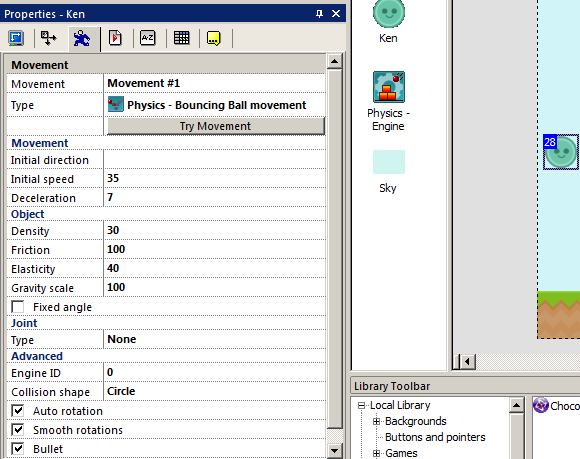
Set his movement type to Physics – Bouncing Ball Movement. Set his initial direction to 11,22,33,45. Then set his initial speed to 35, deceleration to 7. Set his elasticity to 40 (this is the bounce effect). Also check the 'Fixed Angle' checkbox.
Set his Collision Shape to 'Circle' as that what the object is. Also check Auto Rotation and Smooth Rotations. We're also going to check 'Bullet' as he can move at a fast speed so we need precision detection for our character. When you have done this, click on the 4th tab (runtime) and uncheck 'Create at Start'.
We uncheck Create At Start because we want to spawn our character when we click the mouse, we don't need him at the start of the game. We'll cover that further down.
 Let's finish up on adding a power meter, a lives object and a score object.
Drag and drop the object “Power Meter” from the library and then drag and drop the 'Meter Frame' object in and align them accordingly...
Now drop in the + object and the – object and align them accordingly...
Click on the 'Counter' object and set its properties to Min Value = 0, Max Value = 255 and Initial Value = 140. Min Value is the minimum speed to set, which is 0. Max Value is the maximum speed we can use and Initial is the starting speed.
You are better putting these objects in the top, left corner of the frame so they don't block any of the game.
Now, drag in the LIVES object and position this in the top, right hand corner. Drag the SCORE object and position that just below the lives object on the right.
Now, we also need to drop in our 'detector' object. This will give our character a direction to aim in when we fire him, so drop the 'detector' object in the frame and open its property window. In the first property tab (Display Options) uncheck 'Visible at Start'. Your frame editor should now look similar to this...
We have our playarea now setup and ready for some action. If you hit F8 and run your game at this stage, you will see things move about but not much happening and objects falling through objects. Let's jump over to the event editor to make some Clickteam Fusion 2.5 magic happen!
Spread the word!
You can share this document using the following buttons.