
All Boxed Up - Events
4. Making magic in the event editor
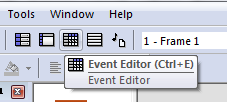
Let's jump into the event editor.
Once in the event editor, we need to create some events to make our game work the way we want it to. The first thing we should setup is collisions and collision detection. Insert a new condition, right-click on the Crate.
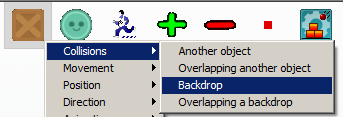
Select Collisions > Backdrop. Remember we set our 'Ground' to a Backdrop. So we're telling Clickteam Fusion 2.5 if our Crate collides with a backdrop (such as the ground) then we need to tell it to stop the crate.
Once you've inserted this condition, scroll along the line until you reach the Crate icon, right-click and select Movement > Stop.

Once you've done that, we need to do the same for if a Crate collides with another Crate. Insert a new condition and select Collisions > Another Object and select Crate. On this condition line, again, go to crate and Movement > Stop.
If you run your game at this point, you will see the boxes now stack on top of each other and don't fall through the ground. We have done this in just 2 simple events. Let's continue and make our game come to life.
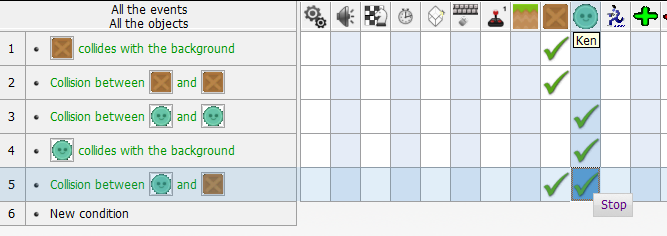
Insert a new condition, right-click on 'Ken' our player, and repeat the above 2 steps for Ken. Collision with Backdrop and Collision with another Ken.
We also need to tell Clickteam Fusion 2.5 if Ken collides with a box, stop. We need to assign a Movement > Stop to both Ken and the Box. Insert a new condition, right-click on Ken and select Collisions > Another Object and select the Crate object. Once inserted, hover over to Ken, right-click and insert Movement > Stop. Repeat this for the crate, like this image...
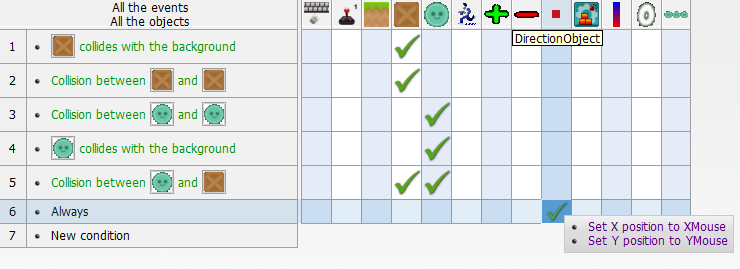
Remember that 'Detector' object we placed in earlier? (The Little Red Square). We are going to perform a bit of magic with that too. Insert a new condition, right-click on the 'Special' object (the first icon – cogs) and select Always. Once inserted, hover over to the Detector object (little red square icon), right-click and select Position > Set X Co-ordinate. In the expression editor type Xmouse. In the same condition, right-click on the same tile and select Position > Set Y Co-ordinate. In the expression editor type Ymouse. This event is saying “Always > Set position to Xmouse,Ymouse”.
So basically, always set the red square to the position under our mouse. We will use this for aiming when we shoot our object, it will aim towards the hidden object under our mouse.
Just in case you are wondering what the event should look like, here it is (line 6)
Now, let's make our 'Speed Meter' we inserted work with our game. We dropped in a PLUS (+) sign and a MINUS (-) sign, we will have it so that when our player clicks on PLUS, it will increase the speed the object is throw and when they click the MINUS it will decrease the speed. So our player can choose what speed to throw the object at the boxes.
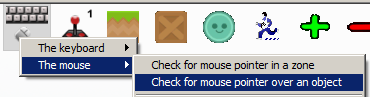
Insert a new condition, right-click on the Keyboard & Mouse object and select Mouse > Check for Mouse Pointer over Object
In the next dialog prompt, we want to detect the mouse is over the PLUS sign so click on the plus sign and click OK.
We need to create a 'second condition' to this existing condition, in the same event right-click on the condition and Add a new condition.
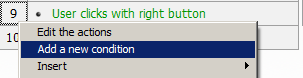
In this new condition dialog, right-click on the Keyboard & Mouse object again and select Mouse > Repeat while Mouse-Key is Pressed and select Left-Mouse Button.
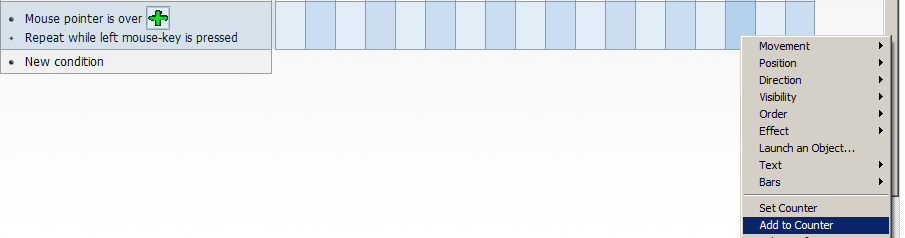
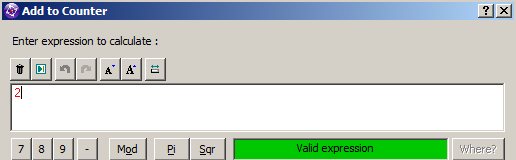
We have now created a condition which contains 2 conditions, both of this conditions need to be true for this event to happen, so our first condition says “Mouse over Object” so the mouse needs to be over the PLUS sign and then the second condition states the user must be clicking the left-mouse. So this would indicate to us that the user wants to INCREASE the power, so let's hover over to our Power Meter Counter object on that condition line, right-click and select 'Add to Counter' in the expression editor, type 2 and click OK.
Now, repeat the above step for the MINUS sign and this time you will need to 'Subtract From Counter' and type in 2. If you run your game now (F8), you should be able to click on the PLUS and MINUS signs to change the power in the power bar.
 Great. We are nearly there now. We just need to create a condition now, where when our player clicks the RIGHT-MOUSE-BUTTON, it will create a new Ken player and launch him in the direction of our mouse and at the speed we set in the Power Meter. Let's do that now. We have lives too, only 3. So we need to check in the next event that there is more than 0 lives available.
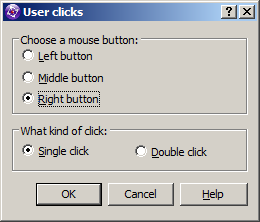
Insert a new condition, right-click on the Keyboard & Mouse object again and select Mouse > User Clicks

In the dialog prompt, select Right Mouse Button.
Click OK. Now we need to insert a second condition to this event, as before right-click on the existing condition and select, Add a New Condition.
Like so...
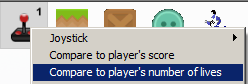
In the new condition dialog, right-click on the Player Icon and select “Compare to player's number of lives”
When the expression editor pops up, we need to put GREATER and type 0. This means our player will only be able to fire a Ken player if he has more than 0 lives. If he has no lives left, he won't be able to fire a Ken.

When the expression editor pops up, we need to put GREATER and type 0. This means our player will only be able to fire a Ken player if he has more than 0 lives. If he has no lives left, he won't be able to fire a Ken.
Now, in this condition line we are going to tell Fusion to create a Ken object to the left of the screen, fire him in the direction of our mouse and set his firing speed to the speed set by the power meter.
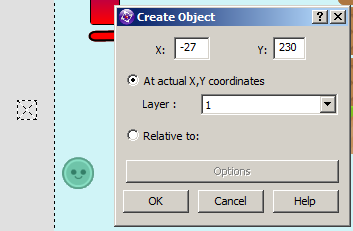
Hover over to the Create Object icon ![]()
Right-click and select Create Object. In the selection dialog, click on KEN, our player. Click OK. In the next dialog, it will ask you where you want to create Ken at this point, let's create him just outside of the screen (to the left) like below...
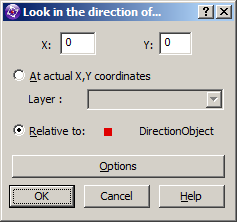
Click OK. Now, in the same condition line, go over to the Ken icon and right-click and select Direction > Look in the direction of... and when it jumps to the frame editor, click on our little red box we created before (DirectionObject) and click OK.
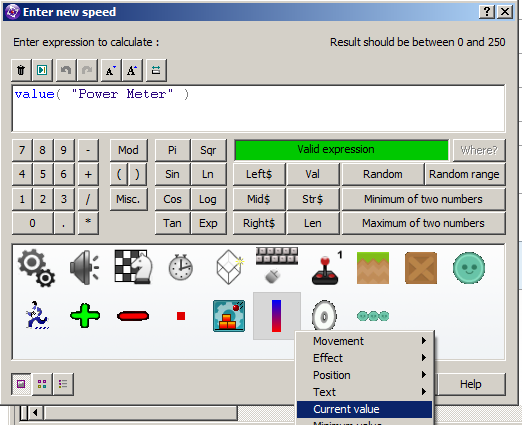
So we've created our Ken object and set it's direction to face the mouse, just one last thing for this is to set the Ken (player) speed to the speed we set in the Power Meter. So, in this same condition line again, right-click on the Ken icon once more and select Movement > Set Speed... and in the expression editor we need to set the speed to the value of the counter (power meter). So in the expression editor, right-click on the counter and select 'Current Value'.
Click OK. I think our game is ready for another test at this point so you can see the hard work you've put in and see the magic happening to hit F8 on your keyboard!
You should now be able to click on the PLUS and MINUS signs to increase/decrease the speed of the player and you should be able to RIGHT-CLICK anywhere on the screen to fire the player out. He should now collide with the boxes and the ground.
Now, one thing we need to add to that last event we did, is to subtract a life from the player every time they fire a Ken (player). So, on that last event line we did, go to the Player 1 Icon, right-click and select Number of Lives > Subtract from Number of Lives

When the expression editor pops up, we want to subtract 1 life from the player, so type 1 and click OK.
That event is now complete.
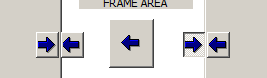
Another little condition we would want to include is something to stop our boxes and Kens from leaving the screen on the right.
Insert a new condition, right-click on Ken and select Position > Test Position of “ken” and in the prompt dialog, select 'Leaves from on Right' like so
Click OK. Hover over to Ken on that condition line and select Movement > Stop.

Repeat the above step again but this time for the Crate object.
Once you've done this, Ken (player) and the Crate objects will not leave the playarea on the left or the right.
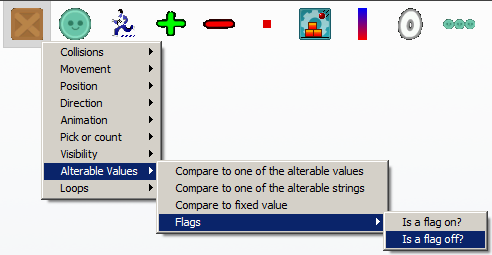
We are now at our final event for the game. We need to detect how many boxes actually fell down so we can give our player a score. So let's do that now. First let's talk about Flags. A flag is either ON or OFF. By objects having FLAGS, we can detect whether a flag is on or off at anytime. Say for instance we were counting bricks, once we've counted a brick, we want to MARK that brick so we know it has been counted, in Fusion you would set a flag on. This means it knows when a brick, or in our case a 'Crate' has already been counted and won't count it twice.
At the start of your game, by default, all flags are OFF. They are always OFF unless you turn a flag ON. To detect that a Crate has fallen, we need to test it's Y position in the playarea.
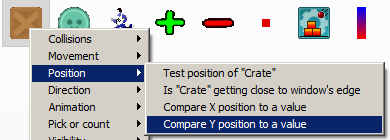
Insert a new condition, right-click on the Crate object and select Position > Compare Y Position to a Value
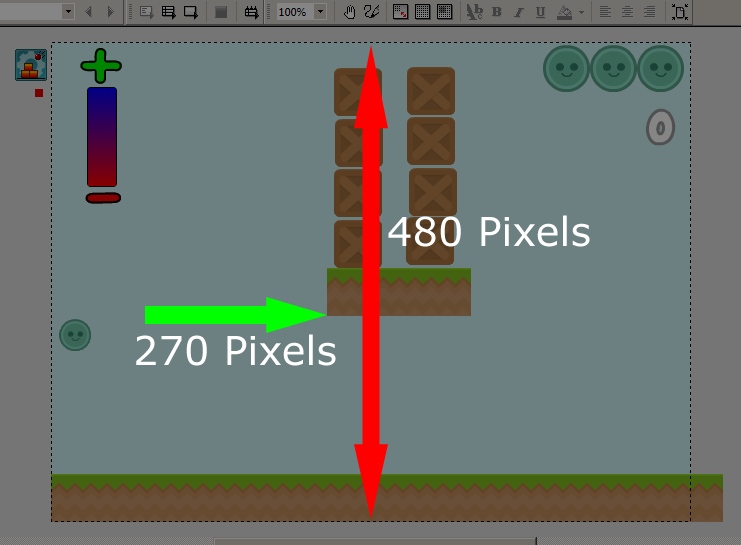
When the expression editor pops up, we need to find a value which would mean the Crate has dropped off the ledge. Select GREATER from the dropdown list then we need to type in 270.
If you are wondering why 270, see below.
Our frame height is 480 pixels. The ledge finishes at 270 pixels, so if we detect a Crate has passed the point of the ledge, we can be assured it has fallen.
Now, we need to add one more condition to our current event, so right-click on the event line (as we did earlier) and select Add new condition.
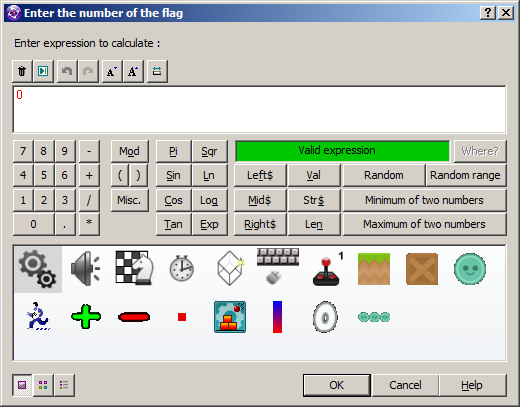
Once you've done this, right-click on the Crate again and select Alterable Values > Flags > Is a Flag Off?
When the expression editor pops up, type in 0 and click OK.
Like so...
Once you've done this, hover over to the Crate icon, right-click and select Flags > Set On. In the expression editor, type in 0. In the same event, hover over to the Player 1 Icon, right-click and select Score > Add to Score and in the expression editor type 1 and click OK.
That is our game complete. If you hit F8 and run the game now, you should be able to set a power (speed) for the character to fire at, use your mouse as the direction and right-click to shoot. The aim is to knock as many boxes off the ledge using just 3 lives.
Spread the word!
You can share this document using the following buttons.