
Faulty Flap: 4. The pipes
Step 4 of 6: Adding the pipes
Let's add the deadly pipes that the player will have to avoid.
![]() In the Frame Editor > Layers Toolbar make sure that Layer 2 is selected. From the Library Window drag pipe-gate.Active in the Frame at coordinates (216,328). Drag also pipe-top.Active at coordinates (216,248) right above pipe-gate.Active. Finally drag pipe-bottom.Active at coordinates (216,408) right below pipe-gate.Active.
In the Frame Editor > Layers Toolbar make sure that Layer 2 is selected. From the Library Window drag pipe-gate.Active in the Frame at coordinates (216,328). Drag also pipe-top.Active at coordinates (216,248) right above pipe-gate.Active. Finally drag pipe-bottom.Active at coordinates (216,408) right below pipe-gate.Active.
 pipe-gate.Active: pipe parent
 pipe-top.Active: pipe top child
 pipe-bottom.Active: pipe bottom child
Your Frame should look like this:
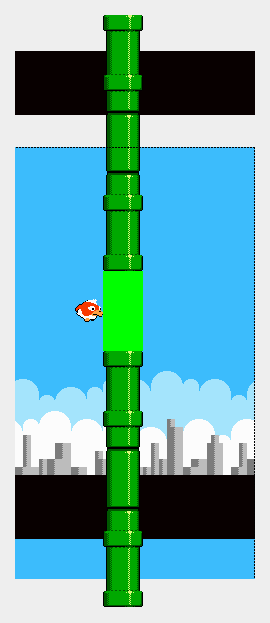
This is our very first pipe obstacle, but why is it made of 3 Active objects?
pipe-top.Active and pipe-bottom.Active are child objects, they will simply follow pipe-gate.Active their parent object. Doing this is very straightforward with Clickteam Fusion. Please read on to find out how.
pipe-gate.Active is set to be not Visible at start, the Bouncing Ball Movement is assigned to it with an initial Direction of 16 (left) and an initial Speed of 25. And its Movement is stopped at start.
Of course we need more pipes. Hold Ctrl and drag pipe-gate.Active at coordinates (472,328). Let's do it one more time, hold Ctrl and drag pipe-gate.Active at coordinates (728,328). Then create the additional instances of pipe-top.Activeand pipe-bottom.Active in the same way. We now have 3 instances of each object.
Your Frame should look like this:
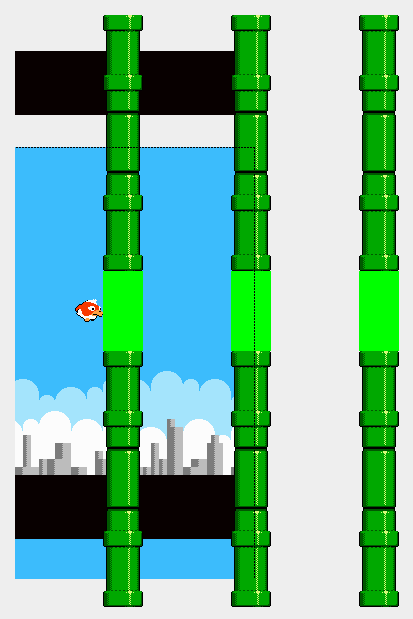
Instead of using numerous pipes in a huge Frame to scroll through, we will use a few pipes only, move them towards the player and reposition them when they leave the Frame. This will produce the perfect illusion of endless horizontal scrolling.
But how to make the child objects follow their parent object?
![]() In the Event List Editor insert a new group of events called pipes.Active and leave Active when frame starts checked. Move it to the end of the list of events. This group will exclusively contain events related to the pipe objects.
In the Event List Editor insert a new group of events called pipes.Active and leave Active when frame starts checked. Move it to the end of the list of events. This group will exclusively contain events related to the pipe objects.
Then add the following event into it:
- Always
![]() (pipe-top.Active) : Set X position to X( "
(pipe-top.Active) : Set X position to X( " ![]() (pipe-gate.Active)" )
(pipe-gate.Active)" )
![]() (pipe-top.Active) : Set Y position to Y( "
(pipe-top.Active) : Set Y position to Y( " ![]() (pipe-gate.Active)" )
(pipe-gate.Active)" )
![]() (pipe-bottom.Active) : Set Y position to Y Bottom( "
(pipe-bottom.Active) : Set Y position to Y Bottom( " ![]() (pipe-gate.Active)" )
(pipe-gate.Active)" )
![]() (pipe-bottom.Active) : Set X position to X( "
(pipe-bottom.Active) : Set X position to X( " ![]() (pipe-gate.Active)" )
(pipe-gate.Active)" )
What happens with this event? We constantly (Always) set the coordinates of the child objects to the coordinates of the parent object.
Even if several instances of each object exist, Clickteam Fusion picks one instance of each object and "attaches them together", thus forming "groups" of instances. This very convenient system is called object pairing.
![]() Run the application and notice how the pipes are static. That's because their movement is stopped.
Run the application and notice how the pipes are static. That's because their movement is stopped.
![]() Add the following event in the Game.Play group:
Add the following event in the Game.Play group:
What happens with this event? Once that the Game.Play group is activated we start the Movement of the pipe objects. This sounds about right, isn't it?
![]() Run the application. The pipes leave the Frame by the left but never come back. Let's deal with this.
Run the application. The pipes leave the Frame by the left but never come back. Let's deal with this.
![]() Add the following event before the first event in the pipes.Active group:
Add the following event before the first event in the pipes.Active group:
What happens with this event? When pipe-gate.Active leaves the Frame by the left we Wrap its horizontal position to the opposite side of the Frame.
![]() Run the application. The pipes are now repositioned to the right side of the Frame, but some of them are overlapping. Let's fix this.
Run the application. The pipes are now repositioned to the right side of the Frame, but some of them are overlapping. Let's fix this.
The Wrap action works in conjunction with the Virtual Size of the Frame. In our case we are interested in the Virtual Width. This setting is located in the Frame Properties > Settings tab. By default the Virtual Width and Height of a Frame are equal to its Size.
Currently when pipe-gate.Active leaves the Frame by the left, the Wrap action repositions it at X coordinate 480 pixels, because the Virtual Width of the Frame is set to 480 pixels. This value is too small and causes the overlapping of the pipe objects. So to which value should we set the Virtual Width?
Look at the pipe objects that we have created on the Frame. Each "column of pipes" is separated by 256 pixels, and we have 3 columns. If we multiply both numbers we find 768 pixels, which is the total horizontal space taken up by the 3 "columns of pipes". So let's set the Virtual Width of the Frame to 768 pixels. When pipe-gate.Active leaves the Frame by the left, the Wrap action repositions it at X coordinate 768 pixels. This should fulfill our needs.
![]() Run the application. The columns of pipes are now evenly spaced!
Run the application. The columns of pipes are now evenly spaced!
But all the pipes have the very same vertical position. This is not very fun nor challenging, so let's add some randomness.
![]() In the Event List Editor add the following event after the first event in the pipes.Active group:
In the Event List Editor add the following event after the first event in the pipes.Active group:
What happens with this event? When pipe-gate.Active is outside of the Frame on the right, we set its Y coordinate to a random value comprised between 232 and 520 pixels, with 9 intervals of 32 pixels.
The X coordinate 480 pixels corresponds to the Width of the Frame.
![]() Run the application. Isn't it already more funny?
Run the application. Isn't it already more funny?
At the beginning of the game the pipes must be outside of the screen. We could move them away by using the Frame Editor, but it's more practical to leave them in place and use events.
![]() Insert a new group of events called Game.Init and leave Active when frame starts checked. Move that group to the top of the list of events. That group will contain all the events that must be performed once at the very beginning of the game.
Insert a new group of events called Game.Init and leave Active when frame starts checked. Move that group to the top of the list of events. That group will contain all the events that must be performed once at the very beginning of the game.
Then add the following event into it:
What happens with this event? At the beginning of the game we simply move the pipes 600 pixels to the right of their initial position.
![]() Run the application. Now the danger is coming a few seconds after the beginning of the game.
Run the application. Now the danger is coming a few seconds after the beginning of the game.
Nothing happens when the bird hits the pipes, let's do collision tests!
![]() Add the following events in the Game.Play group:
Add the following events in the Game.Play group:
- Collison between
 (bird.Active) and (pipe-top.Active)
![]() : Play sample lose
: Play sample lose
![]() (bird.Active) : Change animation sequence to Falling
(bird.Active) : Change animation sequence to Falling
![]() : Activate group "Game.Outro"
: Activate group "Game.Outro"
![]() : Deactivate group "Game.Play"
: Deactivate group "Game.Play"
- Collison between (bird.Active) and (pipe-bottom.Active)
![]() : Play sample lose
: Play sample lose
![]() (bird.Active) : Change animation sequence to Falling
(bird.Active) : Change animation sequence to Falling
![]() : Activate group "Game.Outro"
: Activate group "Game.Outro"
![]() : Deactivate group "Game.Play"
: Deactivate group "Game.Play"
What happens with these events? When the bird collides with a pipe child object, we display his falling Animation Sequence. And more importantly we deactivate the Game.Play group where we test for the player input, preventing any further jumps.
We also activate the Game.Outro group for later use.
This is where we notice the benefit of using two groups of events related to the bird. When the bird hits a pipe object, the bird.Active group remains activated letting the bird fall until he collides with the background objects.
![]() Run the application and try to fly as far as you can! The bird falls down when he hits a pipe.
Run the application and try to fly as far as you can! The bird falls down when he hits a pipe.
We're not completely finished with the pipes. They must stop moving when the bird hits one of them.
![]() Add the following event in the Game.Outro group:
Add the following event in the Game.Outro group:
- Only one action when event loops
![]() (pipe-gate.Active) : Stop
(pipe-gate.Active) : Stop
What happens with this event? Once that the Game.Outro group is activated we stop the Movement of the pipes.
![]() Run the application and hit a pipe. The pipes stop moving. Thinking about it, our game is almost complete.
Run the application and hit a pipe. The pipes stop moving. Thinking about it, our game is almost complete.
One last detail. The bird is sometimes completely hidden behind the pipes. This is because they have been added in theFrame after that the bird was, and thus the pipes are displayed in front of him.
![]() To solve this select bird.Active in the Frame Editor. Then in the main menu select Arrange > Order > To Front. Nowbird.Active is displayed in front of all the objects that are located on the same Layer.
To solve this select bird.Active in the Frame Editor. Then in the main menu select Arrange > Order > To Front. Nowbird.Active is displayed in front of all the objects that are located on the same Layer.
Spread the word!
You can share this document using the following buttons.